I've decided that blogger sucks because posting pictures on it is a such a pain (you have to drag pictures manually in the small viewer, which is extremely frustrating if posting multiple images). I think I am going to switch to wordpress instead. I am already using it to write about baseball, and it's working out great. Wordpress beats blogger hands down. Wordpress has built-in stats to see who is reaching your blog, what search terms lead to your blog, and other neat features. On top of that, wordpress doesn't allow any advertisements, so wordpress blogs are clean and polished.
I think I am going to mull over this idea for a bit longer. If things go according to plan, the new blog will go live on January 1, 2008. Stay tuned. In the meantime, my photoblog is still being updated daily.
Showing posts with label photography. Show all posts
Showing posts with label photography. Show all posts
Sunday, December 16, 2007

Wednesday, December 5, 2007
Photography Inspiration, Part IV
This is part IV of VI for photography inspiration.
31. Revisit Places You’ve Been Before
Item #30 suggested revisiting your past in terms of "archive raiding." However, it also works if you revisit locations to which you've been before. Coming back to a location again will most likely cause you to think beyond snapping so that you will come away with a new, original idea. With regard to national parks, for instance, their beauty is ever-present but different depending on the season. Yosemite has its wonders in the summer, but in the winter it is absolutely breathtaking as well. So re-visit those places to which you've been before. As the photopreneur states, "The light will be different, your skills will be different… and so will you," and I totally agree with that assessment.
32. Ask “What if…?”
This is a question I ask often. What would happen, for instance, if I used shallow depth of field? What if I switched from a wide-angle lens to a macro lens? What if I shot with or without a flash? A lot of times, just because I can, I shoot the same subject but from a slightly different angle, with different apertures, different lenses, and so on. Remember: memory is cheap, but memories are priceless.
33. Leave Constructive Comments
I shall admit that I don't leave enough comments on other blogs. I view the blogs, admire the work, but it takes a bit extra effort for me to provide a constructive comment. I need to work on constructive comments, because the comments that I do leave usually are something to the effect of "beautiful lighting" or "excellent composition." By constructive comments, I mean remarking why I like a certain image and possibly suggesting whether this image could be improved. That said, I believe that any comment is better than none, so I don't mind receiving comments like "great capture" or "nice effect here." One of the books I read in 2007 was Paul Coehlo's novel The Alchemist, and there was one quote that struck me: "One is loved because one is loved. No reason is needed for loving." I think when first looking at a photo, you instantly know that you like it. However, because the emotional process is complicated, you can't really explain why you like a certain image. In other words, there is no need to justify why you like a certain photo; thus, I think that simple comments like "love it" or "this sucks" are perfectly legitimate.
34. Join Photo Contests
Photo contests are a lot of fun. The really prestigious ones, such as National Geographic's "Your Shot" will give you tremendous exposure (featured on the National Geographic website as well as the printed magazine). Before submitting your image, do read the fine print in terms of terms of service and other logistics behind your submission.
35. Choose a Theme
When submitting an image for a photo contest, you're often selecting an image in a particular genre/theme. But sometimes there is the "other" category, in which you're allowed to submit a variation on a theme. So do something creative today.
36. Check out the Big Winners
Major photo contests also have editors which select submissions throughout the year and hand out the "Picture(s) of the Year" awards. Explore those images to get inspired, as these images are often at the top of the class.
37. Go Back to the Rules
There's a saying that goes "You can't break the rules until you know the rules." This adage is certainly true in photography. There are a selection of images which I go back to after initial dismissal because after a bit more experience, I realize that I can post an image and classify it as nonconventional. For instance, motion blur is typically a taboo in images, except when it adds to the effect, such as this image of a runner on the beach:
 So first learn the rules, then learn how to break them.
38. Just Shoot Anyway
This attitude is pretty popular with digital photographers. At times it can be disadvantageous as you end up shooting a whole ton of pictures, but none of them are composed well or visually aesthetic. That said, however, there are times when I am hesitant to break out the camera from my camera bag, but I decide to do it anyway because I think I may be able to come up with something. What's the worst that can happen? You add a couple of shutter clicks to your camera and a few megabytes of used space on your memory card. And as the photopreneur writes, "At best, you might surprise yourself and find a new kind of composition."
39. Get a Cause
If you are shooting for something you believe in, trust in, or have dreams and aspirations about, chances are you're going to push yourself to do a great job. If you stand behind a particular cause, you're more motivated and focused. As a result, your images will follow suit. You'll even inspire others in what you believe in, and that's always a plus.
40. Play with Textures
Photographers often focus on the light and composition. Sometimes, however, it's good to break free and focus on the textures. When I was at national parks, I would shoot landscapes with my Canon 17-40 f/4L lens, but I would also switch to my macro to capture the texture of rocks and certain plants. I think that those images that evoke the sense of touch in the viewer are truly exceptional.
31. Revisit Places You’ve Been Before
Item #30 suggested revisiting your past in terms of "archive raiding." However, it also works if you revisit locations to which you've been before. Coming back to a location again will most likely cause you to think beyond snapping so that you will come away with a new, original idea. With regard to national parks, for instance, their beauty is ever-present but different depending on the season. Yosemite has its wonders in the summer, but in the winter it is absolutely breathtaking as well. So re-visit those places to which you've been before. As the photopreneur states, "The light will be different, your skills will be different… and so will you," and I totally agree with that assessment.
32. Ask “What if…?”
This is a question I ask often. What would happen, for instance, if I used shallow depth of field? What if I switched from a wide-angle lens to a macro lens? What if I shot with or without a flash? A lot of times, just because I can, I shoot the same subject but from a slightly different angle, with different apertures, different lenses, and so on. Remember: memory is cheap, but memories are priceless.
33. Leave Constructive Comments
I shall admit that I don't leave enough comments on other blogs. I view the blogs, admire the work, but it takes a bit extra effort for me to provide a constructive comment. I need to work on constructive comments, because the comments that I do leave usually are something to the effect of "beautiful lighting" or "excellent composition." By constructive comments, I mean remarking why I like a certain image and possibly suggesting whether this image could be improved. That said, I believe that any comment is better than none, so I don't mind receiving comments like "great capture" or "nice effect here." One of the books I read in 2007 was Paul Coehlo's novel The Alchemist, and there was one quote that struck me: "One is loved because one is loved. No reason is needed for loving." I think when first looking at a photo, you instantly know that you like it. However, because the emotional process is complicated, you can't really explain why you like a certain image. In other words, there is no need to justify why you like a certain photo; thus, I think that simple comments like "love it" or "this sucks" are perfectly legitimate.
34. Join Photo Contests
Photo contests are a lot of fun. The really prestigious ones, such as National Geographic's "Your Shot" will give you tremendous exposure (featured on the National Geographic website as well as the printed magazine). Before submitting your image, do read the fine print in terms of terms of service and other logistics behind your submission.
35. Choose a Theme
When submitting an image for a photo contest, you're often selecting an image in a particular genre/theme. But sometimes there is the "other" category, in which you're allowed to submit a variation on a theme. So do something creative today.
36. Check out the Big Winners
Major photo contests also have editors which select submissions throughout the year and hand out the "Picture(s) of the Year" awards. Explore those images to get inspired, as these images are often at the top of the class.
37. Go Back to the Rules
There's a saying that goes "You can't break the rules until you know the rules." This adage is certainly true in photography. There are a selection of images which I go back to after initial dismissal because after a bit more experience, I realize that I can post an image and classify it as nonconventional. For instance, motion blur is typically a taboo in images, except when it adds to the effect, such as this image of a runner on the beach:
 So first learn the rules, then learn how to break them.
38. Just Shoot Anyway
This attitude is pretty popular with digital photographers. At times it can be disadvantageous as you end up shooting a whole ton of pictures, but none of them are composed well or visually aesthetic. That said, however, there are times when I am hesitant to break out the camera from my camera bag, but I decide to do it anyway because I think I may be able to come up with something. What's the worst that can happen? You add a couple of shutter clicks to your camera and a few megabytes of used space on your memory card. And as the photopreneur writes, "At best, you might surprise yourself and find a new kind of composition."
39. Get a Cause
If you are shooting for something you believe in, trust in, or have dreams and aspirations about, chances are you're going to push yourself to do a great job. If you stand behind a particular cause, you're more motivated and focused. As a result, your images will follow suit. You'll even inspire others in what you believe in, and that's always a plus.
40. Play with Textures
Photographers often focus on the light and composition. Sometimes, however, it's good to break free and focus on the textures. When I was at national parks, I would shoot landscapes with my Canon 17-40 f/4L lens, but I would also switch to my macro to capture the texture of rocks and certain plants. I think that those images that evoke the sense of touch in the viewer are truly exceptional.
Saturday, December 1, 2007
Photography Inspiration, Part II
The following is part II of VI to give you some ideas for photography inspiration. Again, this list is my personal take. Read on to learn something new (there's actually something I disagree with the photopreneur, and you may find my awesome suggestion in item #15).
11. Watch a Sports Event
This is a great idea. One of my favourite things to do is to check out baseball games. It is one of my life's goals is to visit all 30 major league ballparks. I have been to eight ballparks already. It's fun to buy the cheap seats and sit in the upper deck because it allows you to wander around the area and take impressive wide-angle shots, such as this one of Dodger Stadium by sunset. Of all the stadium shots I've ever taken, this shot of Turner Field is by far and away my favourite:

So yeah, go to a baseball game and see what you can capture. I've also been to hockey and basketball games, but they are much harder to shoot because of poorer lighting conditions.
12. Visit the Zoo
Hey, here's an idea where you can probably get hundreds of shots. Don't forget to bring the telephoto lens(es) to capture portrait-like images of animals. And as the entrepreneur recommends, "you don’t have to try to squeeze your lens between the bars. Shooting the kids in awe at the monkeys can create some interesting images too." Speaking of visiting the zoo, it's on my to-do list to visit Zoo Atlanta soon.
13. Shoot Fast at a Race Track
I haven't been to a race track in a long, long time. However, what I can tell you is that it allows you an opportunity with a technique called panning. Basically pick a shutter speed that's a bit "slow" and move the camera and lens in the direction of the motion of the speedy car. Although difficult to perfect this technique, the finals results will be worth it in the end! Essentially, if you are successful, the main subject will be sharp against a blurred background. Again, the idea is to follow the subject as it passes in front of you and continue to follow it as you press the shutter button on your camera. Try it out sometime!
14. Visit an Exhibition
Visiting an exhibition is a lot of fun and very informative. Not only would you be exposed to creative techniques, but it's possible you'll end up talking to the photographers who made the picture happen. And how much more can you be inspired than by the artist himself?
15. Browse Google Images
I mentioned this idea in #7 (typing in "wedding photography" in google), but of course you can search for whatever you please. However, I actually will recommend against google images because so much stuff that comes up is garbage (low resolution or otherwise very crappy). I have a much better idea. Go to www.pbase.com, a site dedicated to hosting photos (usually by full-time photographers and excellent amateurs), and do a search (in the upper right there is a search box) for whatever you like. A search for "Yosemite" (as in Yosemite National Park) produces a gallery of tagged "Yosemite" images. And they are spectacular, such as this one of Yosemite in winter. So again, pbase.com is your friend for inspiration!
16. Join Flickr Groups
I won't comment on flickr too much because I don't spend much time there, but according to one photographer, "flickr is photography gone viral." I have checked out a few discussions and threads related to techniques for composition and lighting, and they have been very insightful. I'll probably switch over to flickr eventually (more exposure of my photography is always a good thing).
17. Just Step Back and Watch
This is such a great suggestion, and one with which I absolutely agree. Too many times I see photographers just snapping away, hoping to end up with a killer shot. But if you just sit back and explore the surroundings first, you'd be training your eyes to find something noteworthy to shoot. What I like to do is to hold my camera and lens on my shoulder (or in my photo bag) and walk around with the camera looking for photographing opportunities. As the photopreneur states, "Stepping back and watching the subject can reveal whole new sides. That’s true for portrait photographers, wedding photographers, animal photographers… in fact just about any photographer!" and I couldn't agree more.
18. Roam the World with Flickr Maps
The geo-tagged images on Flickr are pretty awesome. I was exploring images of Zion National Park the other day, and people post very accurate locations (for example, Angels Landing is certainly at a different location than the Temple of Sinawava, headway to the Narrows hike). Flickr Maps is a bit slow (certainly slower than Google maps), but it's a lot of fun exploring.
19. Change your Angle
This suggestion is pretty cool and something I enjoy experimenting with on a frequent basis. While on a recent vacation to St. Petersburg, Russia, I was photographing the area around the Winter Palace (Hermitage Museum). The area is absolutely breathtaking, but what really can set the image apart is if you get down on the ground and capture the cobblestone-covered street, with the Hermitage Museum in the background. And that's exactly what I did! It made for one dynamic image! Again, there's so much you can do by changing the angle!
20. Change your Time
I will admit that most of my shooting occurs in the daytime (I don't shoot enough in the dark). However, night photography is a lot of fun. During my recent visit to Zion National Park, I broke out the camera and tripod and captured a cool (or should I say hot?) scene of campers around their campfire:

If you are shooting with a digital SLR, and if you are going to explore night photography, make sure you use a tripod. Also, sometimes manual focus will be required. In that case, set your lens to the "infinity" mark to make sure everything you shoot will be in focus (this suggestion is applicable to landscape shots, in particular). If you're not keen on shooting in the dark (for whatever reason: you're afraid of the dark, you don't have or can't afford a tripod, etc.), try shooting in the early morning, just before and as the sun is coming out. Morning light is incredibly diffuse and creates an amazing backdrop to your images. Light is worst (for photography) in mid-afternoon, so I'd avoid shooting too much in the daytime. Again, experimentation is key! Just get out there and do something you haven't done before (incidentally, this suggestion applies to life in general), and who knows what wonders you will discover...
11. Watch a Sports Event
This is a great idea. One of my favourite things to do is to check out baseball games. It is one of my life's goals is to visit all 30 major league ballparks. I have been to eight ballparks already. It's fun to buy the cheap seats and sit in the upper deck because it allows you to wander around the area and take impressive wide-angle shots, such as this one of Dodger Stadium by sunset. Of all the stadium shots I've ever taken, this shot of Turner Field is by far and away my favourite:

So yeah, go to a baseball game and see what you can capture. I've also been to hockey and basketball games, but they are much harder to shoot because of poorer lighting conditions.
12. Visit the Zoo
Hey, here's an idea where you can probably get hundreds of shots. Don't forget to bring the telephoto lens(es) to capture portrait-like images of animals. And as the entrepreneur recommends, "you don’t have to try to squeeze your lens between the bars. Shooting the kids in awe at the monkeys can create some interesting images too." Speaking of visiting the zoo, it's on my to-do list to visit Zoo Atlanta soon.
13. Shoot Fast at a Race Track
I haven't been to a race track in a long, long time. However, what I can tell you is that it allows you an opportunity with a technique called panning. Basically pick a shutter speed that's a bit "slow" and move the camera and lens in the direction of the motion of the speedy car. Although difficult to perfect this technique, the finals results will be worth it in the end! Essentially, if you are successful, the main subject will be sharp against a blurred background. Again, the idea is to follow the subject as it passes in front of you and continue to follow it as you press the shutter button on your camera. Try it out sometime!
14. Visit an Exhibition
Visiting an exhibition is a lot of fun and very informative. Not only would you be exposed to creative techniques, but it's possible you'll end up talking to the photographers who made the picture happen. And how much more can you be inspired than by the artist himself?
15. Browse Google Images
I mentioned this idea in #7 (typing in "wedding photography" in google), but of course you can search for whatever you please. However, I actually will recommend against google images because so much stuff that comes up is garbage (low resolution or otherwise very crappy). I have a much better idea. Go to www.pbase.com, a site dedicated to hosting photos (usually by full-time photographers and excellent amateurs), and do a search (in the upper right there is a search box) for whatever you like. A search for "Yosemite" (as in Yosemite National Park) produces a gallery of tagged "Yosemite" images. And they are spectacular, such as this one of Yosemite in winter. So again, pbase.com is your friend for inspiration!
16. Join Flickr Groups
I won't comment on flickr too much because I don't spend much time there, but according to one photographer, "flickr is photography gone viral." I have checked out a few discussions and threads related to techniques for composition and lighting, and they have been very insightful. I'll probably switch over to flickr eventually (more exposure of my photography is always a good thing).
17. Just Step Back and Watch
This is such a great suggestion, and one with which I absolutely agree. Too many times I see photographers just snapping away, hoping to end up with a killer shot. But if you just sit back and explore the surroundings first, you'd be training your eyes to find something noteworthy to shoot. What I like to do is to hold my camera and lens on my shoulder (or in my photo bag) and walk around with the camera looking for photographing opportunities. As the photopreneur states, "Stepping back and watching the subject can reveal whole new sides. That’s true for portrait photographers, wedding photographers, animal photographers… in fact just about any photographer!" and I couldn't agree more.
18. Roam the World with Flickr Maps
The geo-tagged images on Flickr are pretty awesome. I was exploring images of Zion National Park the other day, and people post very accurate locations (for example, Angels Landing is certainly at a different location than the Temple of Sinawava, headway to the Narrows hike). Flickr Maps is a bit slow (certainly slower than Google maps), but it's a lot of fun exploring.
19. Change your Angle
This suggestion is pretty cool and something I enjoy experimenting with on a frequent basis. While on a recent vacation to St. Petersburg, Russia, I was photographing the area around the Winter Palace (Hermitage Museum). The area is absolutely breathtaking, but what really can set the image apart is if you get down on the ground and capture the cobblestone-covered street, with the Hermitage Museum in the background. And that's exactly what I did! It made for one dynamic image! Again, there's so much you can do by changing the angle!
20. Change your Time
I will admit that most of my shooting occurs in the daytime (I don't shoot enough in the dark). However, night photography is a lot of fun. During my recent visit to Zion National Park, I broke out the camera and tripod and captured a cool (or should I say hot?) scene of campers around their campfire:

If you are shooting with a digital SLR, and if you are going to explore night photography, make sure you use a tripod. Also, sometimes manual focus will be required. In that case, set your lens to the "infinity" mark to make sure everything you shoot will be in focus (this suggestion is applicable to landscape shots, in particular). If you're not keen on shooting in the dark (for whatever reason: you're afraid of the dark, you don't have or can't afford a tripod, etc.), try shooting in the early morning, just before and as the sun is coming out. Morning light is incredibly diffuse and creates an amazing backdrop to your images. Light is worst (for photography) in mid-afternoon, so I'd avoid shooting too much in the daytime. Again, experimentation is key! Just get out there and do something you haven't done before (incidentally, this suggestion applies to life in general), and who knows what wonders you will discover...
Friday, November 30, 2007
Photography Inspiration, Part I
I've recently stumbled upon the photopreneur blog, and they had an excellent piece about inspiration for photography. The 60-item list is certainly comprehensive, and I am going to make six posts providing my own take.
Here are the first ten things you can do to experiment with photography.
Here are the first ten things you can do to experiment with photography.
1. Play with Photoshop
Without a doubt, Photoshop is the industry standard for photographers. Whether you are a beginner or a pro, there is always the possibility of bringing out the best in your photos with some help in Photoshop. One of my favourite Photoshop features is the "lens correction" feature, whereby I can straighten buildings (i.e. so that they aren't falling away from the viewer) which have been distorted when shot via a wide-angle lens (such as the Canon 17-40 f/4L). Also pretty awesome are dodge and burn tools, which allow the user to selectively lighten or darken portions of an image, respectively.
2. Read the Manual
Reading the manual is probably the first thing you should do when you get your first camera. So many people ask me the most basic features of their camera, such as what "Av" or "Tv" stands for; with just a little bit of effort (maybe thirty minutes), one can learn the basics of their camera by reading the manual. Don't know how to set the timer on your camera to take pictures? Well, that's covered in the manual. Also, another thing which people struggle with (especially those with point-and-shoot cameras set on auto mode) is how to disable flash. Again, reading the manual will clear things up!
3. Watch a Movie
I love movies. They can certainly give you some excellent ideas of places/locations to shoot, for example. Sometimes, you may be inspired by a movie and try to capture a similar shot. Other times, however, you take a shot and realize later that your shot is similar to a scene from a movie. This realization was a recent occurrence for me as I was looking through my archives and posted an image on my photoblog that resembles the introductory scene of Gladiator:

4. Read a Newspaper
Reading the newspaper (usually on the web but certainly a paper version a couple of times a week) is something I do on a regular basis. The Los Angeles Times has some excellent editorial images in their Calendar and Guide sections. One of my favourite destinations for photojournalism is the "Today's Pictures" section on slate.com. They have something new everyday, and it usually relates to some kind of theme. For instance, the theme for November 30, 2007 is "International Day for Abolition of Slavery." The theme for October 12, 2007 was The Mexico City Olympics in 1968. What I like about the pictures posted on slate is that they are always dated and usually have a brief caption describing the image.
5. Visit a Flea Market
It has been a while since I've been to a flea market, but I have been to outdoor markets in Russia and other places around the world. They have a lot of neat objects which you can photograph (I'd ask for permission first, but if you're shooting with a long lens, then you can probably get away with it)! While I was in Riga, I came upon an outdoor flower stand and captured this image I posted on my photoblog. When going to a flea market or some kind other outdoor market, my suggestion would be to bring a macro lens so that you can take some shots of details. And of course, if you're lucky, you may end up with a nice souvenir or a gift.
6. Shop at a Farmer’s Market
Farmer's Markets are pretty awesome. If they are indoors, make sure you bring a fast lens and shoot at large enough ISO to prevent motion blur. And as the photopreneur blog states, "At a farmer’s market, you know you can find colors, spheres, people, and displays. And dinner too."
7. Check out Some Wedding Photojournalism
Photopreneur suggests checking out the images on display at the Wedding Photojournalist Association’s website. Another idea would be to just type "wedding photography" on google and see what kind of results you get. Wedding photography is certainly a major business for photographers, and there are thousands upon thousands of photographers who have their own website where you may find inspiration, be it in terms of lighting, posing, or whatever else.
8. Hit the Water
I've never actually shot anything in the water because waterproof housing is really expensive for an SLR camera. For instance, the waterproof housing device for a digital Rebel will set you back about $1,150. If you own the Canon 5D camera, the waterproof device for the 5D will set you back more than the price of the camera; a solid system costs about $2,600, or about $500 dollars more than the 5D itself! That said, if you really want to try underwater photography, your best (i.e. affordable) bet would be to stick with a small point-and-shoot; in that case, the waterproof housing systems cost between $100 to $400, certainly much more affordable than the systems for digital SLR cameras.
9. Hit the Streets
Street photography is one of my passions. It's a lot of fun just walking around town (whether close to home or abroad) and photographing the sights around you. To see examples of some the shots I've taken while out about on the town, check out these images: "scenic tour"; "observations"; "a pause"; "street mistakes"; and "taking off." To see more images, just look through the archives on my photoblog.
10. Join a Demonstration
I can envision how demonstrations would be a great place to shoot as they offer a combination of banners, signs, and lots of colours. If you bring a long lens, you can focus on a particular individual's expression during a tense moment. Or bring the wide angle lens to showcase the sense of scale of the demonstration. I like that "the only cause you have to support is photography."
Thursday, November 15, 2007
Photographer of the Day: Brian Valentine
Today's photographer of the day is Brian Valentine. He does amazing macro photography. Especially stunning is his series on waterdrop macros.
Most of the waterdrop macros that you see are actually created through a technique called focus stacking. Focus stacking can be used to increase the available depth of field in a particular shot. For instance, if one is shooting dewdrops on blades of grass which are separated by a few centimeters, it is impossible to have everything in focus, even at apertures like f/32. To get everything in focus, you would capture two or more images, and then combine the two with a program called Combine ZM. For instance, if you look at this image, you'd notice that the focus is on the dewdrop on the left, and the other two dewdrops (as well as the blade of grass) are out of focus. In this image, the focus is on the other two dewdrops. Finally, in this image, the focus is on the blade of grass. To get the final image, one would combine the three images (by focus stacking), and the impressive result is seen here. To see a tutorial of Combine ZM, check out Brian's tutorial page on flickr.
Brian Valentine recommends shooting at about 2:1 (though he shoots at 3:1). To get this magnification, one needs some extension tubes added to their 1:1 macro lens (I shoot with the Canon 100 mm macro, which has a 1:1 magnification). Brian shoots at f/10 to f/11 aperture, and uses ETTL flash manual focus, shooting at 1/200 seconds.

To see more of Brian's work, check out his smugmug page and his flickr page. Pretty incredible pictures!
Most of the waterdrop macros that you see are actually created through a technique called focus stacking. Focus stacking can be used to increase the available depth of field in a particular shot. For instance, if one is shooting dewdrops on blades of grass which are separated by a few centimeters, it is impossible to have everything in focus, even at apertures like f/32. To get everything in focus, you would capture two or more images, and then combine the two with a program called Combine ZM. For instance, if you look at this image, you'd notice that the focus is on the dewdrop on the left, and the other two dewdrops (as well as the blade of grass) are out of focus. In this image, the focus is on the other two dewdrops. Finally, in this image, the focus is on the blade of grass. To get the final image, one would combine the three images (by focus stacking), and the impressive result is seen here. To see a tutorial of Combine ZM, check out Brian's tutorial page on flickr.
Brian Valentine recommends shooting at about 2:1 (though he shoots at 3:1). To get this magnification, one needs some extension tubes added to their 1:1 macro lens (I shoot with the Canon 100 mm macro, which has a 1:1 magnification). Brian shoots at f/10 to f/11 aperture, and uses ETTL flash manual focus, shooting at 1/200 seconds.
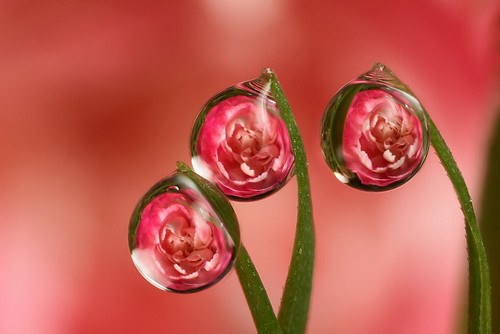
To see more of Brian's work, check out his smugmug page and his flickr page. Pretty incredible pictures!
First post!
Here we go!
The aim of this site will be to expose the reader to digital photography news, awesome photoblogs, and interesting photography on the web.
First off:
Erudite Expressions - my own daily photoblog.
More to come soon!
The aim of this site will be to expose the reader to digital photography news, awesome photoblogs, and interesting photography on the web.
First off:
Erudite Expressions - my own daily photoblog.
More to come soon!
Subscribe to:
Posts (Atom)